
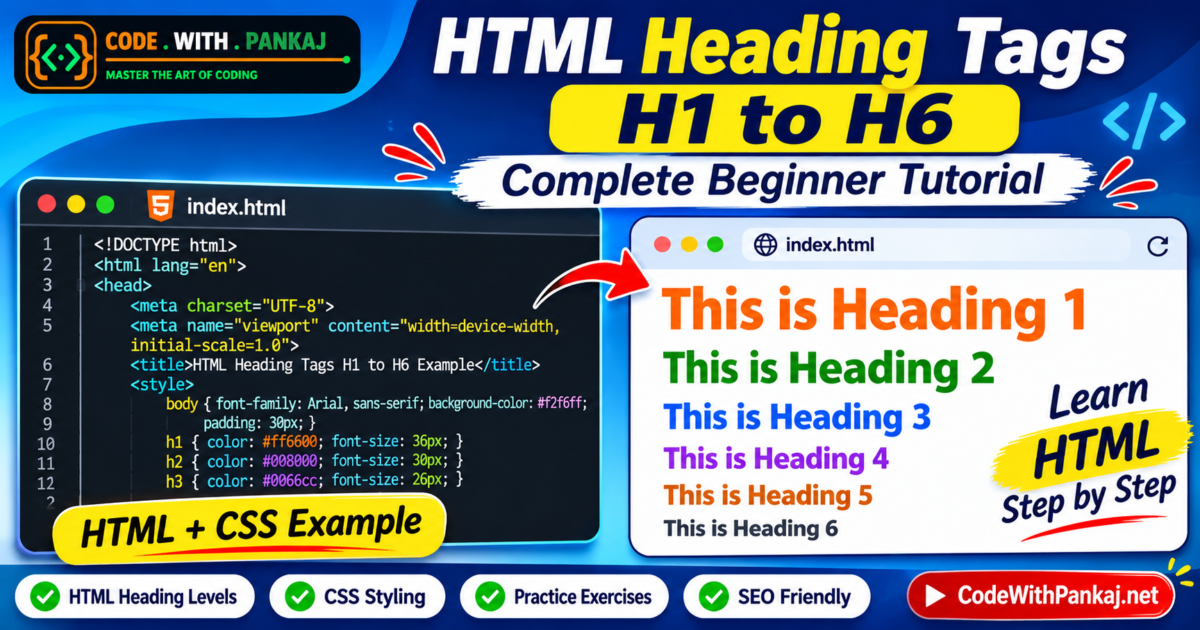
HTML heading tags are used to organize webpage content into meaningful sections. They help readers understand the structure of a page and make it easier to navigate.
HTML provides six heading elements, from <h1> to <h6>. Each heading represents a different level in the content hierarchy.
In this HTML heading tags tutorial, you will learn how to display all six heading levels, understand their differences, style them using CSS, and create your own HTML heading structure with a practical example.
What Are HTML Heading Tags?
HTML heading tags are elements used to define headings and subheadings on a webpage.
There are six HTML heading levels:
| HTML Tag | Heading Level | Purpose |
|---|---|---|
<h1> | Level 1 | Main page heading |
<h2> | Level 2 | Major section heading |
<h3> | Level 3 | Subsection heading |
<h4> | Level 4 | Heading within a subsection |
<h5> | Level 5 | Lower-level heading |
<h6> | Level 6 | Lowest heading level |
The <h1> element represents the highest heading level, while <h6> represents the lowest.
Example of H1 to H6 in HTML
<h1>This is Heading 1</h1>
<h2>This is Heading 2</h2>
<h3>This is Heading 3</h3>
<h4>This is Heading 4</h4>
<h5>This is Heading 5</h5>
<h6>This is Heading 6</h6>
Each heading element has its own default appearance in the browser. You can customize its color, font size, spacing, and other properties using CSS.
Display All Six HTML Heading Levels
Let’s create a simple webpage to display all six HTML heading tags.
Step 1: Create an HTML File
Create a file named index.html in your code editor.
Step 2: Add the Complete HTML and CSS Code
Copy and paste the following code into your HTML file.
<!DOCTYPE html>
<html lang="en">

<head>
    <meta charset="UTF-8">
    <meta name="viewport" content="width=device-width, initial-scale=1.0">

    <title>HTML Heading Tags H1 to H6 Example</title>

    <style>
        body {
            font-family: Arial, sans-serif;
            background-color: #f2f6ff;
            padding: 30px;
        }

        h1 {
            color: #ff6600;
            font-size: 36px;
        }

        h2 {
            color: #008000;
            font-size: 30px;
        }

        h3 {
            color: #0066cc;
            font-size: 26px;
        }

        h4 {
            color: #9933cc;
            font-size: 22px;
        }

        h5 {
            color: #cc6600;
            font-size: 20px;
        }

        h6 {
            color: #444444;
            font-size: 18px;
        }
    </style>

</head>

<body>

    <h1>This is Heading 1</h1>
    <h2>This is Heading 2</h2>
    <h3>This is Heading 3</h3>
    <h4>This is Heading 4</h4>
    <h5>This is Heading 5</h5>
    <h6>This is Heading 6</h6>

</body>

</html>
Step 3: Run Your HTML File
- Save the file as
index.html. - Open the file in Google Chrome or another web browser.
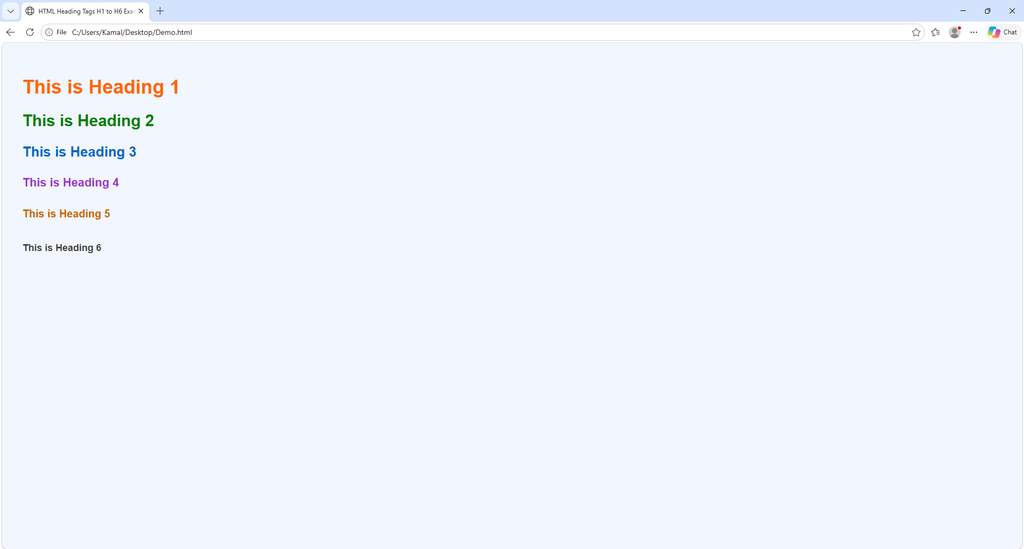
- You will see all six HTML heading levels displayed with different colors and sizes.
HTML Heading Tags Output
The output of the above code will display six headings.
- Heading 1 will appear orange.
- Heading 2 will appear green.
- Heading 3 will appear blue.
- Heading 4 will appear purple.
- Heading 5 will appear dark orange.
- Heading 6 will appear dark gray.
The CSS styles make each heading visually different while keeping its HTML heading level unchanged.
Understanding the CSS Properties
Let’s understand the CSS properties used in this HTML heading example.
1. font-family
The font-family property changes the font used for the text.
body {
    font-family: Arial, sans-serif;
}
This example uses Arial as the preferred font.
2. background-color
The background-color property changes the background color of an element.
body {
    background-color: #f2f6ff;
}
This CSS gives the webpage a light blue background.
3. padding
The padding property adds space inside an element, between its content and its boundary.
body {
    padding: 30px;
}
This creates 30 pixels of space around the content inside the body.
4. color
The color property changes the text color.
h1 {
    color: orange;
}
This makes the H1 heading orange.
5. font-size
The font-size property controls the size of the heading text.
h1 {
    font-size: 36px;
}
This sets the H1 text size to 36 pixels.
Difference Between H1 and H6 in HTML
The main difference between H1 and H6 is their position in the heading hierarchy.
| H1 | H6 |
|---|---|
| Highest heading level | Lowest heading level |
| Usually represents the main topic | Represents a deeply nested subsection |
| Used for the primary page heading | Used only when the content structure requires it |
| Often visually larger by default | Often visually smaller by default |
Remember that heading levels represent content structure, not visual size.
How to Use HTML Heading Tags Correctly
Follow these HTML heading best practices:
- Use a meaningful H1 that describes the main topic of the page.
- Use H2 elements for major sections.
- Use H3 elements for subsections under H2.
- Keep heading levels in a logical order.
- Avoid skipping heading levels unnecessarily.
- Do not use heading tags only to make text bigger or smaller.
- Use CSS to customize the appearance of headings.
- Write descriptive headings that help readers understand the content.
A logical heading structure makes webpages easier to understand and navigate, including for people using screen readers.
Example of a Proper HTML Heading Structure
Here is an example of a heading structure for a beginner HTML tutorial.
<h1>HTML Tutorial for Beginners</h1>

<h2>Introduction to HTML</h2>

<h3>What Is HTML?</h3>

<h3>How HTML Works</h3>

<h2>HTML Elements</h2>

<h3>HTML Paragraphs</h3>

<h3>HTML Heading Tags</h3>

<h4>H1 to H6 Examples</h4>

<h2>HTML Practice</h2>
In this example:
- H1 represents the main topic.
- H2 represents major sections.
- H3 represents subsections.
- H4 represents a subsection inside an H3-level topic.
HTML Heading Tags and SEO
HTML heading tags help organize webpage content into a clear hierarchy.
Search engines can use headings as one of several signals to understand page content. Clear headings also help visitors quickly identify relevant information.
For better SEO:
- Keep your main page heading relevant to the content.
- Use descriptive H2 and H3 headings.
- Include keywords naturally where they fit.
- Avoid repeating the same keyword unnecessarily.
- Make headings useful for readers instead of writing them only for search engines.
Good heading structure supports readability, accessibility, and search engine understanding.
Beginner Practice Challenge
Now it’s your turn to practise HTML heading tags.
Complete these tasks:
- Change H1 to
My Learning Journey. - Change H2 to
About HTML. - Change H3 color to red.
- Change H5 font size to 24px.
- Create a heading structure for your personal website.
- Add a paragraph below each major heading.
- Try different colors and font sizes using CSS.
Practice Example
<h1>My Learning Journey</h1>

<h2>About HTML</h2>

<h3>What I Have Learned</h3>

<h3>My HTML Projects</h3>

<h2>About CSS</h2>

<h3>My Styling Practice</h3>
Try writing this example yourself and customize the headings.
Frequently Asked Questions About HTML Heading Tags
1. How many heading tags are available in HTML?
HTML provides six heading tags: <h1>, <h2>, <h3>, <h4>, <h5>, and <h6>.
2. What is the difference between H1 and H6?
H1 is the highest heading level and usually represents the main topic. H6 is the lowest heading level and represents a deeply nested subsection when needed.
3. Can I change the font size of HTML heading tags?
Yes. You can change the font size of any heading using the CSS font-size property.
4. Should I use only one H1 on a webpage?
Using one clear H1 as the main page heading is a recommended best practice. It helps establish the primary topic of the page.
5. Are HTML heading tags important for SEO?
Yes, headings help organize content and give search engines useful context. However, heading tags alone do not guarantee higher rankings.
6. Can I use H3 directly after H1?
It is generally better to follow a logical heading hierarchy, such as H1 followed by H2 and then H3. Avoid skipping levels unnecessarily.
Conclusion
In this tutorial, you learned how to display all six HTML heading levels using H1, H2, H3, H4, H5, and H6.
You also learned how to style headings using CSS, understand heading hierarchy, follow basic SEO practices, and create your own HTML heading structure.
Keep practising HTML and CSS to improve your web development skills.
Happy Coding!
Want to learn more HTML and CSS?
Visit CodeWithPankaj.net for more beginner-friendly programming tutorials